
To see if this custom-fit item will work for you please tell us what vehicle you'll use it with.
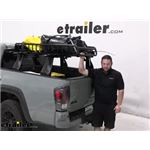
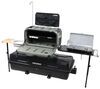
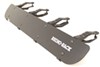
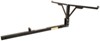
The sturdy Reconn-Deck lets you carry cargo on your next outdoor adventure. This customizable, mid-height rack keeps your gear above the bed but easy to reach. Vortex crossbars work with channel-mount and clamp-on accessories.
Features:
Specs:
 Alternate Instructions
Videos are provided as a guide only. Refer to manufacturer installation instructions and specs for complete information.
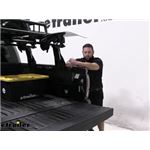
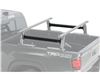
What's up everybody, it's AJ with etrailer.com Today we gonna be checking out the Rhino-Rack Reconn-Deck Truck Bed System on a 2021 Toyota Tacoma. We're gonna be inside here just to take a closer look. These are gonna be your towers, and they attach to the existing rails inside of our truck. We got a Tacoma we put it on today, so all we did was pop off this cap, they slide in with some blocks to install it. Didn't take that long, and it's a nice firm grip on there. It's not going anywhere.
I like that it's kinda up and out of the way, instead of putting something down here that kinda gets in the way of truck bed space, it doesn't mess with anything here. We got our tote and our cooler upfront, everything slides underneath here. It's a really cool system to, like I kinda said before, maximize the space you have in your bed. So you can only put so much down here, so why not add some things on top Another thing to talk about with the Rhino-Rack Reconn-Deck system, is that it comes in two different styles. Right now we have the Vortex Aero bars on here, that way we can use our clamp accessories that we already had.
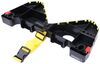
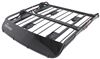
And you can see how the clamps fit around the Aero bars, just like they always do. And now these are attached to the tower, so that's gonna be open up to a bunch of accessories. Now there's another route you can go, and use the Reconn-Deck bars here. So these are gonna go on there and these have more T-tracks, so you're not gonna be able to fit clamps around here most likely. But the grooves in here can be used for T-track accessories, which they give you four positions on your bar to use them, to really customize it and add a bunch of extra stuff.
So looking at the bars here up top, you've got our Vortex Aero bars. You got the weather strip up here at the top. You can peel that back and put in T-track accessories if you want to. We're using all clamp on just because that's what these Aero bars are good for. The clamps fit around there very easily.
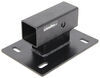
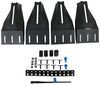
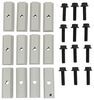
And it was very nice to use all of these that we already had, so I didn't have to buy new accessories. Now, if you did need to use the T-track, you can just pull off the cap and access it there and you see at the end I can peel up the weather strip just a little bit and then slide it there just like normal. It's nice that you have both options with the bars, you don't have to pay for one or the other. Now moving down, we're going to talk about the tower. This is the portion that attaches to the channel and your bed. Made out of a black powder coat aluminum, and the nice thing about that is even if you do scratch off some of the black powder coat and there's exposed aluminum, it still won't rust the chrome on you. So it's totally fine to leave it on your truck bed, at all times if you want to the elements aren't going to bother it. Altogether the whole system has a weight capacity of 220 pounds. Now it is slightly less than the Reconn-Deck system if you have the Reconn-Deck bars on top, it actually has a weight capacity of 330 pounds. And that's gonna be more for if you want to throw a tent up there or the heavier stuff. But with these Aero bars, you don't need all that and you can still fit your accessories on there just fine. The other nice thing that they include is these blocks, these plastic blocks that go over the bolts and that kind of locks things up, that way nobody can mess when they're in that So I'm kind of trying to do it without looking, that didn't work out so well. So just pop that off. You see the bolt does expose right there. So what you do, you just put this on and turn it with the key, the same Rhino-Rack key you've used for everything else and that locks into place. So there's this one and there's some that go on the top by the rails. There's actually on the other side, I can show you here in a second, but there's another little bit that go up there and locks it. Not only does it lock this, the base, the towers to your channels, it'll lock the bar to the towers. And then if you want it to, you can get lock cores for the end of your Vortex Aero Bars to actually lock those up too. That way you can't pop this cap off to get to any accessories. If you have T-track accessories, you can't take the bar off and you can't take this off. Something else to think about when I'm working with these, I've worked with a few different bed rack systems, like the Yakima BedRock it clamps on, and it even has attachment for channels. So if you didn't have the channel like this, you could use it with that and put it in there. This one I like it better, cause it fits right in the channel you don't need an adapter for it, it's made to do this. So I think this is a little bit better, if you have these channels. Another thing would be comparing it to the Reconn-Deck other system that you can get. the other option where it has Reconn-Deck bars up top, those are more heavy duty. So if you're looking to throw a tent up there, that's probably the way to go for that one. Plus if you already have a bunch of T-track accessories and you kind of want to customize it and adjust it for your way you want to use it. That's the one way to go too. I like the Aero bars on here, cause I didn't have to get new accessories. All these clamp ones are going to work just fine. They are T-track on the top, That way If I had some other T-track thing, I could still slide those in if I needed to use them. It's kind of a best of both worlds. There's gonna be a little bit less of a weight capacity that would be with the other one, but I'm fine with that. It holds all the gear I need, and then I can still put stuff in the bed. Just going to get some measurements, I'm going to measure from the raised portion of the bed, to the bottom of the bar here. Looks like we're right at 30 and a half inches. So that's plenty of space. If you say even with these clamps coming down, they're not in any danger of hitting any of the gear we have loaded up. The tote and the cooler fit right on there just fine. Another thing to look about would be from the raised rail or sorry, from the raised portion of the bed to the top of the bar, we're going to be, 31 and a half inches all the way to the top. So that's just from here to up here is how much space it's gonna add to it. Another thing to think about would be how much clearance you have from the back glass. There's a reason we didn't screw these all the way up to the tracks to the front, because you want to leave space for accessories like the cargo basket there and our snowboard. They're gonna stick out, our skis will probably stick out even more. You want to make sure that's a little far from the glass just to make sure it doesn't make contact. A couple more measurements, we're gonna go from the cab to the tower looks like it's 15 inches from here to here. Just to give you a better idea of how much you should set yours when you go to set this up. Another thing to think about would be, center center on the crossbar spread. So let's go crossbar to crossbar, looks like it's 28 and one quarter inches. So that's how much of a space we gave in between these, just for our accessories. That's another thing to look at too, is look at where your clamps are, your accessories, and see how much space you need to get that right. All that being said though, how hard is it to install I know I've mentioned it a few times, it's just a couple of blocks and in this channel. They provide you with the tool you need to go ahead and put it all in there. It didn't take me that long to get it all set up. Check out how I did it. First thing we want to do is come to our track here, inside the bed and pop off the cap. So what we're gonna do is just push it on there, slide that out and now we have access here. So we're gonna take our silver blocks and slide those into place. So we're just gonna put them in the track, make sure the thinner side up here is up front and that's the only way it's gonna fit. We'll slide each one of them in. There we go. All those in place you can go ahead and put the cap back on, cause we're not gonna need to slide anything else in the track. Slides on really easily. So then we have the tower. So the tower's gonna line up with those three silver blocks. So you see those in there. You line up with these slots here and that's how we're gonna attach it. So let me get the other hardware to get this started. So I'm gonna take our bolt, feed it through our plate here with the grippy teeth facing out, because the grippy teeth are gonna go against the grippy teeth here. Just slide that into place. And we're lining up this bolt with the hole or a silver plate, block actually sorry. Let's get that hand-tightened so it helps hold itself in place. That's gonna make it easier to install the other ones. Now we're gonna add our next two right in here. Same thing as before kind of line them up, give them a hand-tighten, and only do it a hand tighten so far. We won't tighten it all down until we got the bars installed. But also notice that I have it in the highest position in the tower. You got to pull it all the way up here as far it can go, that way get them as much height out of it as we can. So it looks like that one's hand-tight, that one's hand-tight. I'm gonna have to move that block over just a little bit. There we go. So this last one hand-tight and then we're gonna go ahead and add the bar up top next. Now I'm taking our bar, I'll use the key to unlock the end here, take off the end cap. We're gonna slide these T-tracks bolts in here at the bottom with the bolt facing out. Cause that's what's gonna attach it to the tower. So with those in place, just replace our cap. And then I'll set the bar on top of our towers here. So lifting it up here, You're gonna adjust both bolts, make sure they go where they're supposed to. You got the holes up top here if you want to check those out real quick before I put the bar in. You can see them right there. So it's nice that these aren't in place, You don't have to move them you can just move your hand get one of them lined up in the correct spot. There you go. Then they drop into place. And then we're gonna do the same thing on this side as well. There we go. We're gonna come back and add a nut to each bolt, barely hand-tight there. I'm only doing this so when I go to adjust the bar side to side it doesn't accidentally pop out of the tower. It just protects us and keeps it in place, when I shift it back and forth. Now we're gonna kind of shift the bar back and forth to make sure it's even on both sides, and get as close as I can just by looking at it first. And then I'll get the measuring tape out and get exact measurements. So we go from the end of the bar to our tower here, about five inches on this side and it's about five inches on this side. So it looks like we're actually good. So we can start tightening down now. This tool was included with the Reconn-Deck system, so you got our half inch saga here up top. It's kind of loose and easy. Sometimes it pops off when you use it so be careful, cause it's only got that much keeping it on. And then this part here is gonna be used to torquing things down. So you can see the blue tag, it tells you how much of that torque its gonna have. So this part will bend up as you tighten it, to see where it's at. Now it is kind of long and it could take some time with it, so we can see how long it is and it doesn't ratchet. So I would suggest if you have a tool kit, just getting a ratchet with a half inch socket on there, it's gonna be far easier to just go ahead and tie everything down. And then come back and torque the rest of it down with the included tool. Now you can see as I turn this, this plastic piece comes out a little bit more, a little different letting us know exactly where it should be and you go by what it says in the instruction. It looks like we're right there where it told us to be on that center bolt. We're gonna repeat the same process for these two and then tighten the bolts up top. Repeat this process on both sides. Now with it fully tied down and torqued, I can shake the base and shake the entire Tacoma back and forth. There's no rattling or movement here at the base, so you know that's not gonna go anywhere when you're going on the road. So then the last thing we're gonna do is add our covers, it acts as locks. So you got a cut out here at the bottom, let's go right there on that lip, so up and then make sure that this portion is in the unlock position so it fits through that hole right there. We'll come back here and lock it up. So with that in place there, you got another one that goes up top, same deal. Make sure it's unlocked. Fits on there, goes into place use that key lock it up. Now those are at least covered, so if somebody comes around and tries to mess with this and they don't have that key, they can't take this off so they can't remove those center bolts. Overall, wasn't that bad to get it installed. We got all our gear thrown up here, got my bag strapped down, gave it the shake test. You can see I'm shaking the whole Tacoma back and forth. So I've got nothing to worry about. It's gonna stay on there when we're going down the road. We got our cooler and some other totes here in the bed. So really maximizing the space we have. Well I think that does it. Thanks for hanging out and I hope this helped..
Do you have a question about this Ladder Rack?
Info for this part was:
At etrailer.com we provide the best information available about the products we sell. We take the quality of our information seriously so that you can get the right part the first time. Let us know if anything is missing or if you have any questions.


Thank you! Your comment has been submitted successfully. You should be able to view your question/comment here within a few days.
Error submitting comment. Please try again momentarily.